
Tuesday, December 8, 2009
spicy roasted butternut squash


GOOD MORNING!!!
This receipt is for Jessy's great friend Sarah!!!
I originally took it out of a great great cook book by Jamie Oliver......called the Naked Chef!
This hardly takes any trouble....can be as cheap as possible....and can be chopped up and used with pasta..or in risotto.....or mashed like mashed potatoes....topped with a bit of Parmesan cheese and cream...yyuuuuummmmm
so here goes...this one is for you Sarah!
SPICY ROASTED BUTTERNUT SQUASH
1 medium butternut squash(about 1 1/2-2 pounds)
(helpfull hint.....the spices i am going to give you below...yes wil give you a wonderful flavorfull veggie.....but don t worry if you dont have them.....salt/pepper///and wellll i do love my chili flakes now.....will do just as well!!! :-) )
2 teaspoon coriander seeds(i use the 1 teaspon powdered)
2 teaspoon dried oregano
1/2 teaspoon fennel seeds
1 dried teaspoon dried chili pepper flakes(more or less to your liking!
1 teaspoon salt
freshly ground pepper to taste
lots of powdered garlic(the receipt calls for fresh minced garlic....but i find it burns!/
1 tablespoon oil oil!...yes that is really all it needs.....so you see it is not only yummy and healthy...it is also quite dietetic !!!
o. k. so lets begin!!!!
wash the squash(it's a funny name... no?)
..especially the skin....since it will become nice and crunchy, and you will
eat it also like you eat potato skins
then
with a large sharp knife cut the squash in half
with a large tablespoon....scoop out the seeds....put aside and save
Now cut the half's into quarters .....and then depending on how thick or thin
you want it ...cut again (the thiner the more spicy, and quicker it will cook!
the larger the slices, the more creamy and purer of a butternut taste you wi
ll get, but it will take longer
i like mine around 1 inch think....they will look like little boats
take out a nice size(preferably shallow) bowl
put all the dry ingredients , including the olive oil, in the bowl
add the squash and with your hands mix it all!
now at first, it will look like not all the pieces are covered, but have patience, eventually ,by rubbing, the dry ingredients on the spots that are naked...all will be covered, AND your hands will have had a nice exfoliation(:-)
place the squash pieces in a line, skin side, down on a shallow baking sheet
making sure you have scraped MOST of the dried herbs,out of the bowl and on top
of the squash
roast in a preheated 400 degree oven until tender inside, and carmelized and crunchy/chewy outside
there all done....now just eat..yummmmmmmmy
helpful hints.......i like to preheat the baking tray by putting it in the oven for a few min BEORE in put the squash on it.....you will know it is right because the squash will sizzle when you place it on the tray!
oh oh oh and the SEEDS
well i have to say for many years i have tryed in vain to make good pumpkin seeds to no avail....but i tried with these seeds and they were DELICIOUS
ssoooooooo here is what you do
separate the goo from the seeds.....come on you whimpy guys you can do it....then place the seeds in the uncleaned bowl that you used for the squash...it will have a lot of flavor still in it......roll around the seeds to use the last of the dried herbs(no oil necessary)....put on clean baking tray...and cook(400 degrees)....and watch
how long....well this is the secret i learned ...the darn things POP!!!.....when i heard a POP!.....i knew they were done!!!! (not very scientific) or should i say gastronomic :-)
SO THERE IT IS...THAT WAS THE EASY PART lets see how the loading of photos goes....:-(
Saturday, November 28, 2009
thanksgiving at the penninsula

thank-you again Dave and
Vanessa for the lovely extravagant thanksgiving at the Penninsula hotel!11!
roasted broccoli with chili and lemon

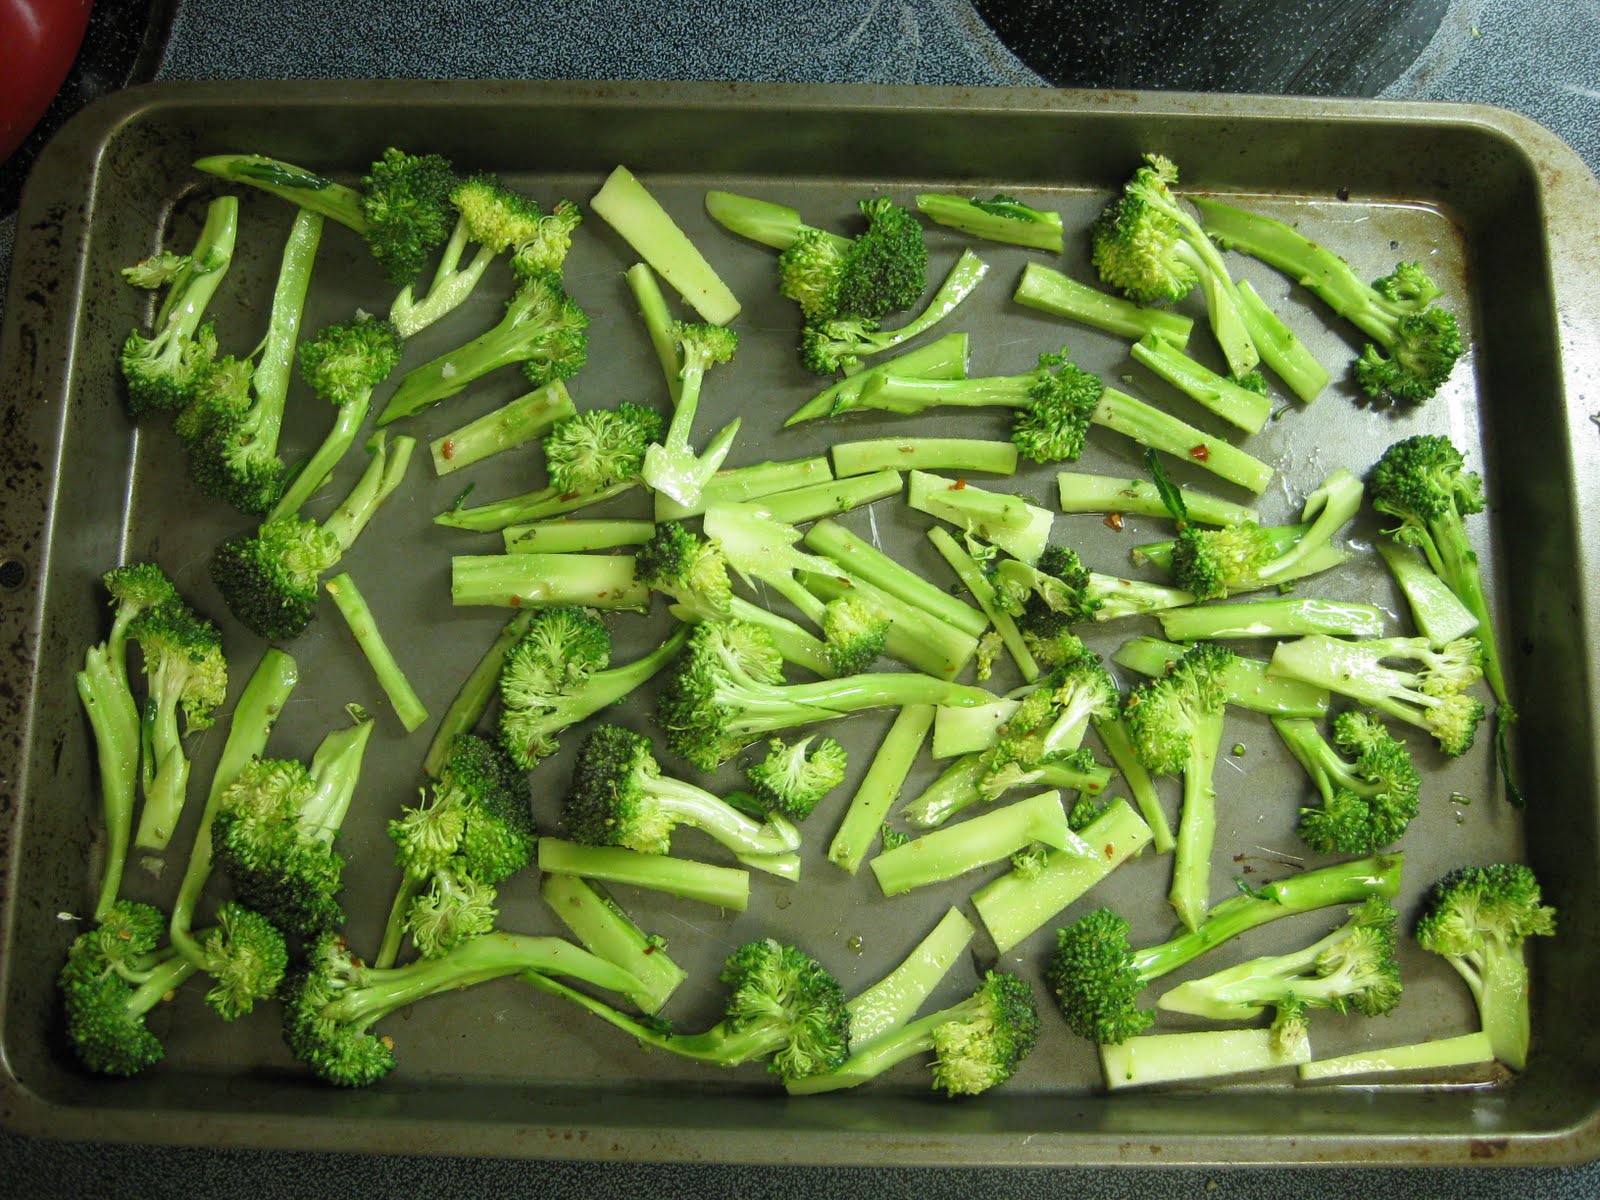


ROASTED BROCCOLI with olive oil ,lemon, herbs and chili!!!1! uummmmm
this one is as easy as pie.....and i must admit..i love it like it is a junk food....as much....and i know you will not b able to believe this.....but it does the job like a good old bag of potato chips....yeah, i know.....it DOES seem unbelievable!!!
o k we begin.
1 head of broccoli, including the stalk
some olive oil and lemon.....died oregano and died garlic....option....but good
1....pre heat oven to 400 degrees
2....cut 4 inches of the stalk off.....then cut that in half.....peel away , with knife or potato peeler.the outer tough bit
3....cut these half's into julienne pieces(julienne means pieces that look like match sticks)
4....now cut the "flowers" into thinnish pieces......see photos
5......put all the cut pieces into a bowl that fits, and drizzle over 1 tablespoon olive oil....a pinch(to your taste) chili seeds.......salt/pepper/ and oregano and garlic powder mix this all together with your hands
6..while you are mixing this, put your pan(preferably a cookie baking sheet), into the oven to heat up
7... a few min later take the cookie sheet out of the oven an put the broccoli mixture into it evenly(no laying) making sure you scrape out all the oil and seasonings
put into middle rack of the oven, fro between 20 and 30 min
7 you will know it is done....when the broccoli is soft....yet ,has alot of brown crunchy lookin bits(these are the best bits...uuuummmmmm) please take the pan out and put the coked broccoli in the same bowl.....correct seasonings(salt/pepper?) and add fresh squeezed lemon to taste....
I DARE YOU NOT TO EAT IT ALL!!!
i am going to include alot of photos....because the trick of this receipt is to cut the broccoli correctly so it becomes soft/yet crunchy
sssoooooo try it and tell me how you all do ;-)
Wednesday, November 25, 2009
yyyyyyUUUMMMMMM VERYBERRY AND LEMONCAKE

yyyyyyyUUHHHHMMMMMMMM.....VERY BERRY AND LOVELY LEMON CAKE...
this is absolutely..the most yummy berry cake ....if you have the money(i know you kids are on a tight budget!)put in double the amount of mixed berries= 2 cups of berries! it may take a little longer to cook...but it is so very good especially eaten soon after cooling a bit, WITH A DOLLOP OF WHIPPED CREAM oorrrrrr eat when warm with wonderfully good vanilla ice cream!!!!!!!!!
1 cup plain flour
1 teaspoon baking powder
3/4 cup ground almonds(or make some in the Cuisinart)
185 grams(it will say on the wrapper)unsalted butter
1 cup sugar
1/4 cup lemon juice
2 teaspoon vanilla extract
2 large eggs
1cup(i like 2)seasonal mixed berries...blueberries/raspberries.etc
1 cup cream (optional) or ice cream
1. preheat the oven to 350
2. grease the pan you are going to use...i use a very cheap 8 by 8 inch square baking pan....if you have a 8 or 9 inch springform pan, that is even better!OH OH ... a springform pan, is a baking(round)pan, that the sides can slide off after the baking!
tip.....to "grease" a pan..you can do it 2 different ways....you can put a tablespoon of nontasting oil....like sunflower...and wipe it all over the pan with a paper towel...or finger, making sure all excess is wiped out, orrrrr, the way i like to do it is take a stick of butter and smear it all over and then i take my fingers to make sure it is in all the corners...you guys know how i like to TOUCH everthing!!!!
o k back to yummy berry cake!!!!!!
3. in a large bowl sift(use your wire strainer)together the flour and the baking powder, then stir in the ground almonds
4. place the butter, sugar, lemon juice and vanilla in a saucepan and stir over a low heat until the butter has melted and the sugar dissolves.
5. gradually mix the melted butter mixture into the the flour mixture until just combined (wooden spoon)
6. then add the eggs, one at a time, mixing well after each addition
7. pour the batter into the prepared tin and evenly distribute the berries on top, gently pressing the berries into the batter
8. bake on the middle shelf of the oven until a skewer/toothpick, comes out nearly clean around 40 min, but start checking after 30 min(i like my cake more moist)
9. leave the cake in the tin and place on wire rack to cool
(don't we usually eat the whole thing 15 min after it comes out of the oven!!!! :-)
IT IS GREAT SERVED WITH FRESH HOMEMADE WHIPPED CREAM ooorrrr yummy ice cold ice cream!!!!!!
BASIC thanksgiving turkey stuffing

BASIC STUFFING
here is our basic turkey stuffing......i must admit nearly of the receipts i will give you on this blog, will have pretty organized measurements, but unfortunately......turkey stuffing is something i do by doing.
WHAT does that mean...well ,when i started doing turkey overseas, there Was no stove top stuffing...no butterball....(some of my ovens/cookers, did not even have constant heat!).
When i ordered my first turkey in Italy ,22 years ago, I thought I was doing quite nicely, in my very rudimentary Italian, as to how important it was that i have a full turkey. Imagine my surprise when this very proud italian butcher beckoned me in to his small shop,to show me the turkey he had ordered.
And how very nicely he had cut it all up in pieces for me. AAAAnnnddddd this he proudly displayed in his window.!..figuring the American community...would now be pounding down his door!!!! But back to to recipe !
1......days before buy 2-3 loafs french bread/baguette, cut into smallish bread cubes1/4...1/2inch(this should give you around 6/8cups)
2.....leave out in large shallow bowl or the pan you are going to roast the turkey.....and every time you go into the kitchen give them a toss around to help dry them out ...
3.... chop at least 1 cup onions
4.... chop at least 1 cup celery
5.....if using fresh sage , wash and coarsely chop
6.....if using bacon(1 pound)..chop into 1 inch pieces so it will cook more evenly and quickly
7.....if using the breakfast sausage...take out of casing(skin)..and crumble
O K READLY TO START!!!!!
1. in a large skillet ..on medium heat add either your bacon OR your breakfast sausage.....cook until done....take the meat out and drain on paper towel.
2...now drip out NEARLY all the fat/grease, but make sure you leave the crunchy bits that stick to the bottom of the pan, they are full of flavor(but, and this is a BIG but......if you have burned those bits, you must clean out your pan and only use the bacon or sausage. then add an extra bit of oil!!!)
3....in this same pan
.....add 1 tablespoon olive oil...then 1 tablespoon butter
2.......then add onions....cook a few min(cook gently....maybe you will have to turn down your heat abit)
3........add celery to onions...your celery to onion ratio should be the same
4....add some salt and pepper to taste..and cook gently until soft and translucient
5........when onions and celery are pretty well cooked add your sage and cook another 5 min
6.......take off stove and gently incorporate the bacon or sausage
7......put you bread cubes in a large large bowl(they should be a little crunchy by now) after the onion/celery mixture has cooled abit...add this mixture to the bread cubes...
8.....stir and stir and stir and stir and stir
9 .....take your chicken stock...which you will slighty slightly heat up in the micro wave...and add some to your stuffing if it is too dry,
10......correct seasonings...you know how it should taste!
helpfull hints.....there SHOULD be alot of onion/celery/sage.....if, after you have completed step 9...there is not.....saute up some more!....and add it in and taste again!!! what is better than tasting stuffing!!!...and remember this is only a basic receipt..and your first try!!!....in the years to come you may want to add say "parsley/rosemary/nuts...anything
just always remember it should be more moist than not!aaannnnnndddd it always tastes better in the bird
Tuesday, November 24, 2009
things you are going to need to buy at the grocery store for your first thanksgiving dinner
THANKSGIVING shopping list,
one small organic turkey(10-14 pounds)
big bag of onions
4-6 large carrots(or more)
large bunch of celery
2 large bunches fresh sage, or dried sage(remember the sage is very,very, important!)
either bacon or breakfast pork sausage
2 sticks of butter
2 large oranges
2/3 large white baguettes (for the stuffing)
box of organic chicken stock
flour for making of gravy
turkey baster?
fresh bread crumbs.....oorrrr fresh bread croutons for stuffing
FRESH BREADCRUMBS
first of all...... the type of bread....preferable ..should be white baguette.....soft spongy bread just will not do....neither will sourdough(even tho i do love it!!)..just trust me on this ..that once you have used home made breadcrumbs......you will want no other.....
so take your baguette...cut into cubes( bread a bit stale.........even better...........and this is a wonderful way to use the day old bread you did not eat)
ZIZZZZZZ ZZZZZIIIIIIIIZZZZZZ, in the Cuisinart (probably blender will do also)
DO NOT ZIZZ TO MUCH....the beauty of handmade breadcrumbs is that they are MORE chunky and fluffy
They will be great for breaded chicken/fish/veggies....or the top of your mac and cheese.!..well,you get the idea.....if you have some left over....just save them in a plastic ziplock and put into freezer for when you do need them!!!!!
FRESH CROUTONS for the BEST STUFFING EVER!!!!
This only takes a bit of remembering to do things ahead of time....
again....a nice baguette(you probably will need two to three to stuff a smallbird)
chop into chunk size 1/2.....1/4/ cube size.....and leave out to dry, this can b done days (3-4) before the DAY before you are going to use them....and that is because, you are going to make the stuffing the day BEFORE Thanksgiving!
Tuesday, November 17, 2009
spinach mac and cheese

mac and cheese just seems like it should be purple lettering....don't you think!!!
this one is for jess and jons good friend sarah...whom they meet in Cairo....Sarah your receipt looked good but far far too complicated.....really mac and cheese should be mac and cheese...with maaayyyybe just a little finagling.....so here is MY new favorite
400 grams macaroni
2cups(full cream) milk
1 cup (250 mill)cream (whipping cream)
1 1/2 cup(180 grams)....or more:) grated strong cheddar
1 1/2 tablespoon Dijon mustard
sea salt and cracked black pepper to taste
1 bag baby spinach
1 more cup sharp cheddar
optional fresh bread crumbs on top(more about this late
1.preheat oven to 200c.....390f
2.cook macaroni in a saucepan of boiling salted water for ten to twelve min or until al dente(which means in Italian.....just cooked with i bit of tension in the middle)
3.drain the macaroni and return to the pot
4.add the milk ...cream.....cheddar....salt/pepper....and spinach ...and gently mix to just incorporate
5. spoon in 375ml ovenproof dishes.........top with extra cheese ....and i like a very light dusting of homemade bread crumbs!
bake for 10 to 15 min....for until the cheese is melted and golden!
o k ...now for the helpful hints.....
I like a more shallow ovenproof dish.....this way there is always more crunchy topping!!!!!
i like to make smaller portions......i find this receipt enables me to make 1 dish for 2-3...and 2 individual portions......which i then freeze.....this dish freezes beautifully!!!
Ariana....had the lovely suggestion...to use leftover cheeses....great idea.....just remember....cheese tastes should be compatible and more on the strong side
i love to serve spicy green beans.......roasted broccoli....and something...red.....maybe cherry tomatoes/rosemary....... seared in a cast iron skillet..with crunchy sea salt/cracked black pepper///uuummmmmmmmmmm
any questions :) oh homemade fresh bread crunbs NEXT post!!!!
whipping cream verus whiping eggwhites!


..
for the tiramisu...you have the beat the egg whites. till fluffy.....now remember....here is the rule
egg whites..... room temp
whipped cream....cold
i used to always confuse this......
so...if your receipt calls for whipped egg whites....you must plan a little in advance...so that those whites will be room temp!
also i know you guys are all poor uni students and might not have all the equipment...so you might not have a beater....you could but a really cheapy hand(yes by hand).mixer..or you guys...in olden days ..the chefs beat egg whites by HAND.....wow think of the muscles those guys had!!
tryed it once ....took at LEAST 15 min....i was crying at the end......
ssoooooooo anyquestions about the tiramisu rceipt
Sunday, November 8, 2009

good morning darlings......well i am ready to start my blog this very morning......annndddd we are going to start with "tiramisu"
and this receipt is for Antoine...and his "shout out for it"!.....thanks for missing our receipt sooo very much...it is true we did alot of it in Cairo!!!!
this receipt will never get to a restaurant...simple because it is so fresh and soft....i am not quite sure how they would serve it(i suppose individually)...when we lived in Italy..i arrived with you Jon ....you were only 3 weeks old.....talk about jet lag!!!...and i left with Jess...only a few months old. also....boy i came with a baby and left with two..!!!..no wonder i have such fond memories of Italy.....well Italy is just plain wonderful if you like food and art and architecture.....oh i digress....i have alot of english speaking lady friends married to italian men....and one of them gave me this "old italian mama's" receipt"...i truely think it is the easiest and the BEST tiramisu receipt of all!!
tiramisu (pick me up in italian)
250 grams fresh(not frozen)mascarpone(1 small tub)
2 eggs separated(room temp)
12 savoiardi cookies(lady fingers)
1/2 cup cold strongggggggg coffee(like esspresso)
2(or3:) )...tablespoon amaretto or gran marnier
2 1/2 tablespoon sugar
o k lets make it!!!!!
find a shallow bowl/plate....i used to use a ceramic pie dish...about one inch deep.....that the biscuits just fit snuggly in
1) put the cookies in a flat dish(one layer)...pour cold coffee over cookies
2)beat egge whites till stiff and put aside
3)in another bowl mix egg yellows, marscarpone, sugar, and gran marnier(amaretto)
4) fold egg whites gently into the above mixture until just mixed pour over cookies
5)sift cocoa powder(jon used to call the "antrax") on top and put in frig to set a bit
6)try not to finish it all at first sitting!!!!!!!!!!!!!!!!!!!!
Monday, October 12, 2009
the beginning......tiramisu
tiramisu........it means in italian.....pick me up!
this is my very first posting on my very first blog.......wwwwwhhhhiiiiicccchhhhhhh...i did MYSELF.......yes it is true ...i cannot even believe it myself!
i have decided to start a blog.....for my children and their friends......
because they are all pestering me for receipts.......are emailing me for receipts....
you see i was the stay at home mom.....and ...well i wasn't much at cleaning.....but boy do i like to cook....and eat......and cook and eat.....you see the point...
so tiramisu...\
i lived in italy for 4 years.....jess was born there...i loved italy....probably my very best posting.....
Subscribe to:
Posts (Atom)
